


How To Check The Calibration Of A Goldmann Type Applanation Tonometer
Developed over 50 years ago, goldmann applanation tonometry remains the gold standard for the measurement of intraocular pressure (IOP) to this very day.
The common misconception around goldmann type applanation tonometers is once you have bought your instrument no routine maintenance or calibration checks are required.
Maintenance is only considered necessary when something has wrong for example:
- The instrument has been dropped and doesn’t work
- The calibration is outside of the original equipment manufacturer (OEM) specification.
The reality is, this assumption is incorrect and there is clinical evidence to suggest regular calibration error checks are required and necessary as route maintenance. In fact, Wessels and Oh (1990) have also suggested that new tonometers checked within 3 months of purchase may develop calibration errors in the range of 1.5–3.25 mmHg, falling outside the OEM’s acceptable margin of error at ±0.5 mmHg.
Failure to perform routine calibration error checks could ultimately have a negative impact on patient outcomes.
What is the OEM manufacturer’s recommended margin of error?
The OEM recommend calibration error of its goldmann tonometers should remain within ±0.05 mmHg.
Any tonometer found to be outside the margin of error should be removed from clinical practice and returned for recalibration.
What does ±0.05 mmHg look like on an actual tonometer?

What is the current clinical practice for tonometer calibration checks?
A study by Kumar and Hillier published in Eye in 2009 published a clinical study on this very topic. The purpose of the study was to evaluate the current practice regarding calibration error checks in the United Kingdom and assess the views of senior nursing staff in charge of outpatient clinics as to whom they believe to be responsible for calibration error checks in their department.
Participating ophthalmology units in the UK
A total of 155 eye units were identified in the UK and contacted. A 100% response rate was achieved. All participating facilities used goldmann applanation tonometers in routine clinical practice.
At each institution, a senior nurse familiar with the day-to-day running of the outpatient ophthalmology clinic responded to a structured telephone questionnaire regarding the goldmann tonometer calibrations errors checks.
Respondents were asked how often all goldmann tonometers in clinical practice were checked for calibration errors, and whom they felt to be responsible for checking tonometer’s for calibrations errors (doctor/nurse/departmental responsibility).
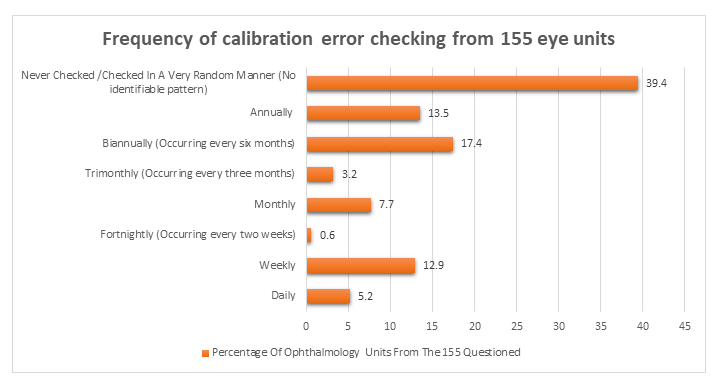
The results:
- In 61 Ophthalmology Units, they either ‘Never Checked / Checked in A Very Random Manner’ for calibration errors, representing 39.4% of the 155 units questioned.
- In 21 Ophthalmology Units, they ‘Annually’ checked for calibration errors, representing 13.5% of the 155 units questioned.
- In 27 Ophthalmology Units, they checked ‘Biannually (every six months)’ for calibration errors, representing 17.4% of the 155 units questioned.
- In 5 Ophthalmology Units, they checked ‘Trimonthly (every three months) for calibration errors, representing 3.2% of the 155 units questioned.
- 12 Ophthalmology Units they checked ‘Monthly’ for calibration errors, representing 7.7% of the 155 units questioned.
- 1 Ophthalmology Unit checked ‘Fortnightly (every two weeks)’ for calibration errors, representing 0.6% of the 155 units questioned.
- 20 Ophthalmology Units checked ‘Weekly’ for calibration errors, representing 12.9% of the 155 units questioned.
- 8 Ophthalmology Units checked ‘Daily’ for calibration errors, representing 5.2% of the 155 units questioned.
Question: Who Is Responsible For Calibration Error Checking?
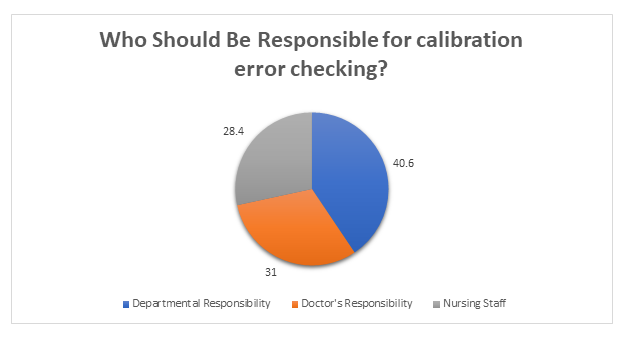
The results:
- In 63 Ophthalmology Units, the respondents felt it’s ‘Departmental Responsibility’ to check for calibration errors, representing 40.6% of the 155 units questioned.
- In 48 Ophthalmology Units, the respondents felt it’s the ‘Doctor’s Responsibility’ to check for calibration errors, representing 31% of the 155 units questioned.
- In 44 Ophthalmology Units, the respondents felt it’s ‘Nursing Staffs’ Responsibility’ to check for calibration errors, representing 28.4% of the 155 units questioned.
How Often should it happen?
The study suggests annual calibration checking is normal practice. However, this is deemed to be insufficient to ensure tonometer accuracy. They suggest that tonometers lose their accuracy during routine clinical practice and may develop calibration error, which frequently over-estimate IOP.
A Doctors Opinion On Who They Felt Calibration Error Checking Lies With
- A previous study by Kumar and Jivan (2007) studied the practice of doctors in the UK and found that 85% of the Doctors surveyed said they have never checked a tonometer for calibration errors and 70% of responding Doctors felt that calibration error checking was not their responsibility.
Verdict: The Doctors believe the responsibility of calibration error checking lies with either nursing staff or other hospital staff to ensure the accuracy of tonometers.
Important Factors This Raises
A previous study by Sandhu et al (2005) aimed to test how many times calibration error checking was required before the error appeared and they found that only 10% of the studied tonometers in clinical use were within the margin of error allowed by the manufacturer of ±0.5 mmHg.
Where Is The Margin Of Error Likely To Show: On The Positive Or Negative Range?
Calibration errors are more likely to show on the positive range rather than negative which may ultimately overestimate IOP measurements. This loss of tonometer accuracy could have a significant impact on a patient's clinical outcome
This Is Great Information, But Again How Does This Help Me And How Does It Answer The Question Of Why An Accurate Tonometer Is Vital For IOP Measurement?
To answer the problem, we must first understand the underlining cause of the problem. Only then can we break down the problem to solve each intricate part one problem at a time.
From the clinical information discussed earlier what is abundantly clear so far is that there is no clear consensus of where the responsibility of calibration error checking lies.
This means that tonometers currently in clinical use may be receiving inadequate calibration error checks. A study by Turner and colleagues (2013) from Australia including 3654 IOP measurements found that 1mm Hg under or over reading of tonometer will miss 34% of people with ocular hypertension or result in 58% more positive screening tests, respectively. Similarly, a 4mm Hg under or over reading would miss 76% of individuals with ocular hypertension or over-detect seven times more people. This has important implications for clinical care and resources as over-detection could result in more than usual referrals to ophthalmologists, while under-detection may place individuals at higher risk of glaucoma.
Therefore, its vitally important each eye unit develop a directive/procedure to ensure that all tonometer’s in clinical use are given the correct amount of attention to ensure they all meet the adhered to specification outlined by the OEM manufacturer.
The Brawn Medical Recommendations:
Suggested Hospital Protocol For Ophthalmology Units / Outpatients Eye Clinics
Nursing Staff Responsibilities
Hospitals’ eye casualty units often see many patients on a weekly basis, as a result tonometers often get used on a more frequent basis. Therefore, our recommendation for calibration error checking is as follows:
- Have a ‘Calibration Bar’ (shown below) in each examination room so that any nurse, doctor or hospital technician can easily check the tonometer for calibration errors when required.

- The head nurse along with their respective teams should carry out daily calibration errors checks using the ‘Calibration Bar’ before the start of a clinic each day. Calibration error check should be performed at ‘0’ (no need to use the calibration bar on zero), ‘2’ & ‘6’ (two & six require the use of the calibration bar)
- Calibration error checks will roughly take no more 3 minutes per tonometer (1 minute per sequence at ‘0’, ‘2’ & ‘6’)
- Any tonometers that fail to test at ±0.5 mmHg at any of the three sequences (‘0’, ‘2’ & ‘6’) should be taken out from clinical practice and sent out for a ‘FULL SERVICE and NOT just a recalibration, (This will be explained in further detail below)
Hospital Technicians’ Responsibilities
Whilst we can appreciate that hospital technicians look after more than just tonometers at a hospital, we would make the following recommendations
- Keep a ‘Calibration Bar’ handy when making daily/weekly rounds at the ophthalmology department. The calibration bar is a key tool that will help measure the calibration error for any given tonometer.
- Tonometers should be checked by a technician preferably twice per week. Once before the start of the weekly clinic and once at the end of each weekly clinic.
- Each tonometer should be checked at the following three sequences (‘0’, ‘2’ & ‘6’). Any tonometer that has a calibration error outside the OEM manufactures acceptable margin of error (±0.5 mmHg) should be immediately removed from clinical use and sent for a ‘FULL SERVICE’ and NOT just a recalibration (More to be explained in further detail below)
What Would Your Recommendation For Opticians & Privately Owned Optical Practices.
Optical practices being much smaller institutions, either franchise owners or privately-owned businesses will naturally have less resources than hospitals. Therefore, we make the following recommendations:
- Again, as hospitals, it is vital to keep a ‘Calibration Bar’ handy in each examination room.
- Before you open for business, first thing in morning the practice manager or lead optician should first go around all the examination rooms and test each tonometer for any calibration errors and make sure it sits within the OEM manufacturers’ acceptable margin of error at ±0.5 mmHg. (This should take no longer than 3 minutes per tonometer, 1 minute per sequence ‘0’, ‘2’ & ‘6’)
- Each tonometer should also be tested at all three sequences ‘0’, ‘2’ & ‘6’.
- Furthermore, when examining a patient, it is important to double check the instrument you are using functions correctly before using it on a patient. This means performing a quick calibration check on ‘0’ & ‘2’.
Closing Comments
The recommendations provided above for both hospitals and private opticians are what we think is the best method in ensuring that the equipment used is working to the best of your knowledge and importantly provide the examiner with the most accurate instrument to measure IOP.
One of the earliest glaucoma trial showed that decreasing IOP by 1 mmHg leads to a 10% reduction in the risk of progressive nerve damage (Heijl et al., 2002) . Therefore, it cannot be underestimated as to how important a well calibrated tonometer is vital in the management of glaucoma.
How To Check The Calibration Of Your Contact Goldmann Applanation Tonometer
From all the information shared in the clinical publication we have now established having a well calibrated tonometer is vital for IOP measurement.
But the question is how does one know how to check calibration errors on a tonometer correctly and most importantly, accurately.
Not everyone is familiar with this process.
So, let’s break it down by first by understanding the anatomy of a tonometer.
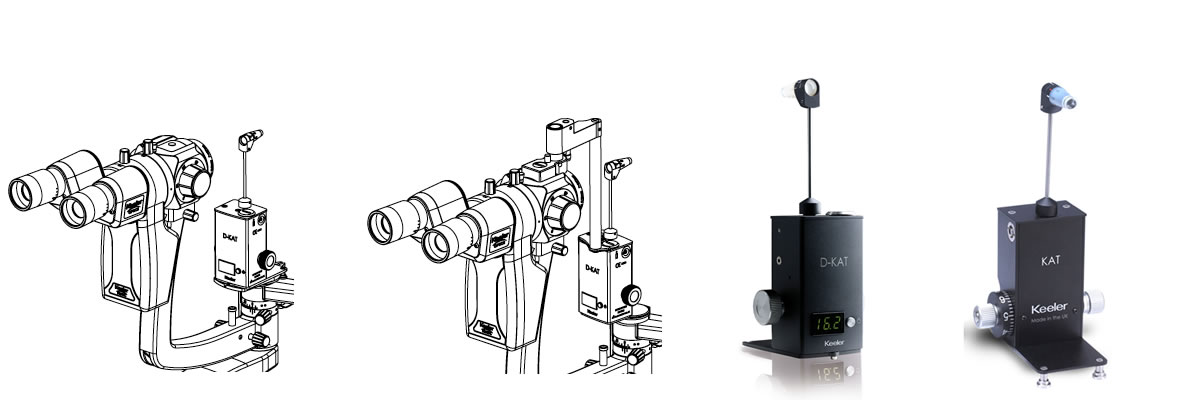
These are things common to all ‘Goldmann Type Applanation Tonometers’ regardless of the model (T-Type – Take Away Model or R-Type – Mounted on a Slit Lamp) or manufacturer.
In case you thought we forgot, this also applies to the digital tonometers. The only difference is you have a digital read out that displays the reading.
Contact Tonometer Anatomy
Here is a quick run through of the anatomy of the tonometer, something we will be frequently referencing.
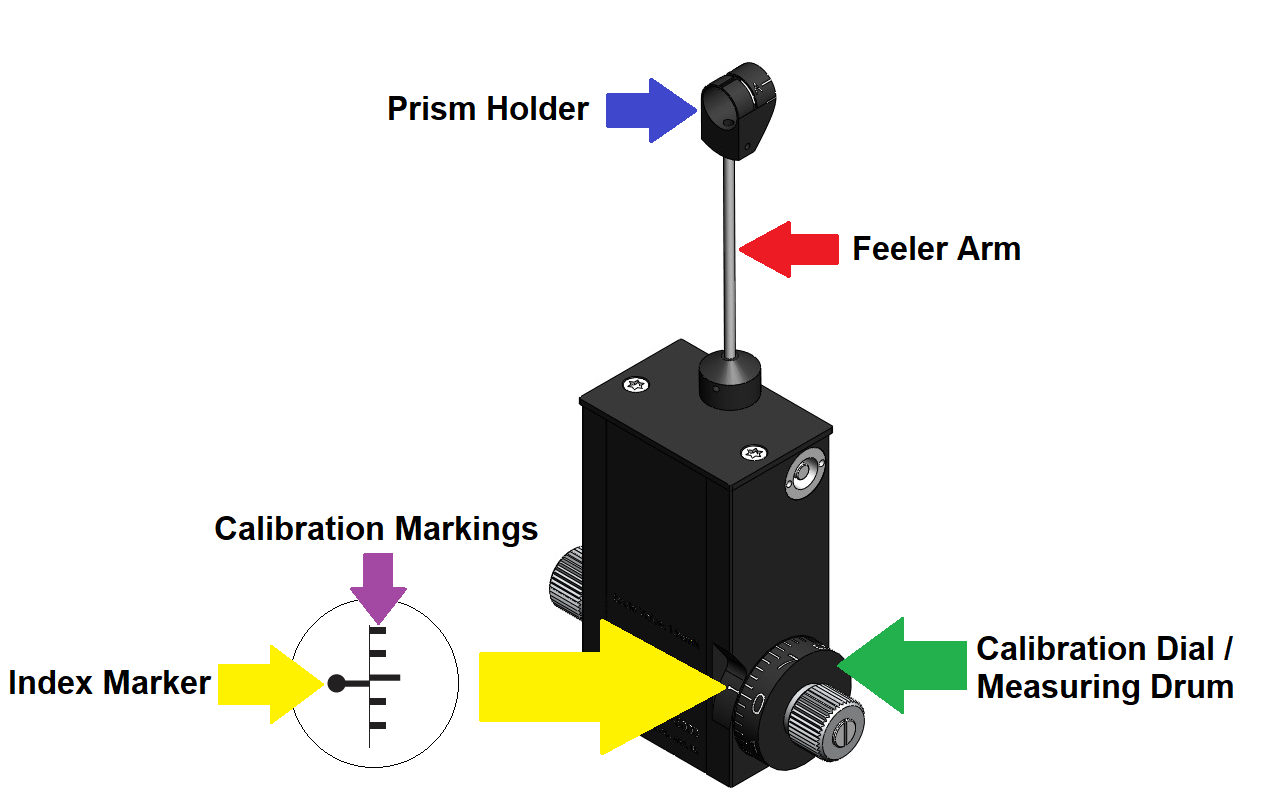
The common terminologies
- Prism Holder: This is where the prism is inserted when the ophthalmologist/optometrist is ready to perform the examination.
- Feeler Arm: This swings forward or backward depending on the direct the calibration dial is rotated (positive or negative range).
- Calibration Dial / Measuring Drum: This is used to rotated forward (positive range) or backward (negative range) depending on the ophthalmologist/optometrist.
- Calibration Markings: Are used to measure how far forward or backward you have rotated the calibration dial from the ‘Index Marker’ at the ‘0’ sequence.
- Index Marker: This the crucial starting point the ophthalmologist/optometrist uses to rotate the dial forward into the positive range or backward through the negative range.
Method Number 1: Calibration Error Checking Without A Calibration Bar
The first method of checking calibration of the tonometer is done at ‘0’ and can be performed without the need of a calibration bar.
Items Required:
Prism

Calibration Error Checking At The ‘0’ Sequence
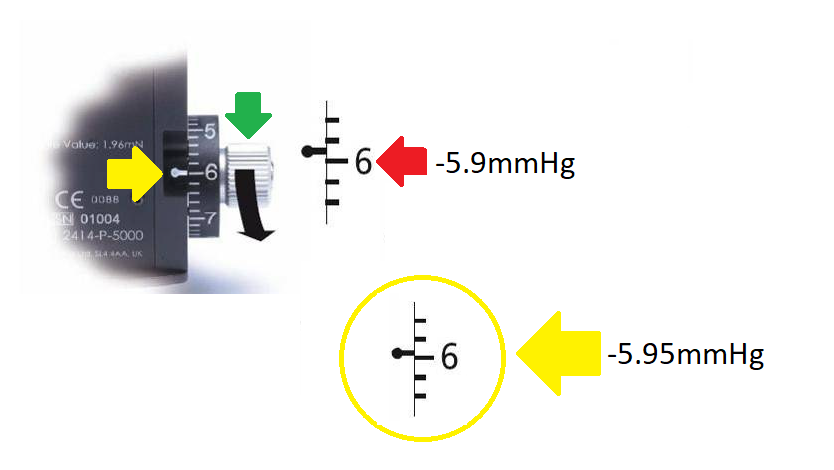
Insert a prism into the prism holder, as shown below.

When the calibration dial is at the ‘0’ sequence the feeler arm should be in free movement (should be able to rock between the patient and examiner freely). Turn the calibration dial indicated by the green arrow in the image below in the negative range (downwards) as indicate by the black arrow by the ‘width’ of one calibration marking against the index marker (indicated by the yellow arrow) it should swing forward in the direction of the examiner.

The correct reading at the ‘0’ sequence on the NEGATIVE RANE should be -0.05mmHg
Checking The Positive Range
Insert a prism into the prism holder if you have not already done so.

When the feeler arm is in free movement turn the calibration, dial indicated by the orange arrow in the image below in the positive range (upwards) as indicated by the black arrow by the ‘width’ of one calibration marking against the index marker (indicated by the yellow arrow) it should swing forward in the direction of the patient.

The correct reading at the ‘0’ sequence on the POSITIVE RANGE should be +0.05mmHg
Method Number 2: Calibration Error Checking With A Calibration Bar
For this procedure, you will require a calibration bar to perform calibration error checking at the following sequences ‘2’ & ‘6’
Items Required:
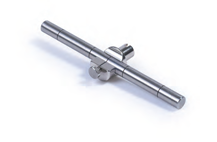
Calibration Bar
Prism
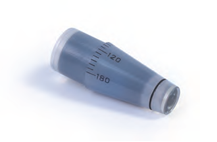
Calibration Bar Markings
Shown on the image below, are five rings engraved on of the calibration bar, this should be adjusted accordingly when checking calibration errors at the following sequences: ‘2’ & ‘6’.
How to adjust the bar?
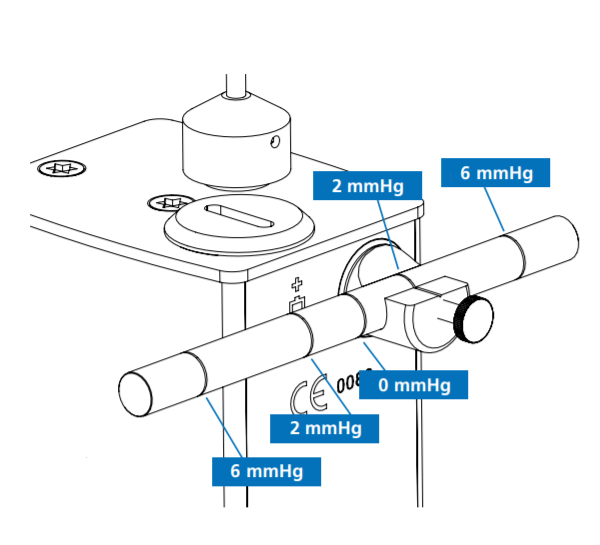
The centre ring corresponds to 0 mmHg, the immediate left and right rings correspond to 2 mmHg and the outer rings correspond to 6 mmHg.
Slide the bar along the holder until the 2 mmHg reference mark (or the 6 mmHg) aligns perfectly to the index line on the holder. Ensure that the longer portion of the calibration bar faces the examiner.
Calibration Error Checking At The ‘2’ Sequence
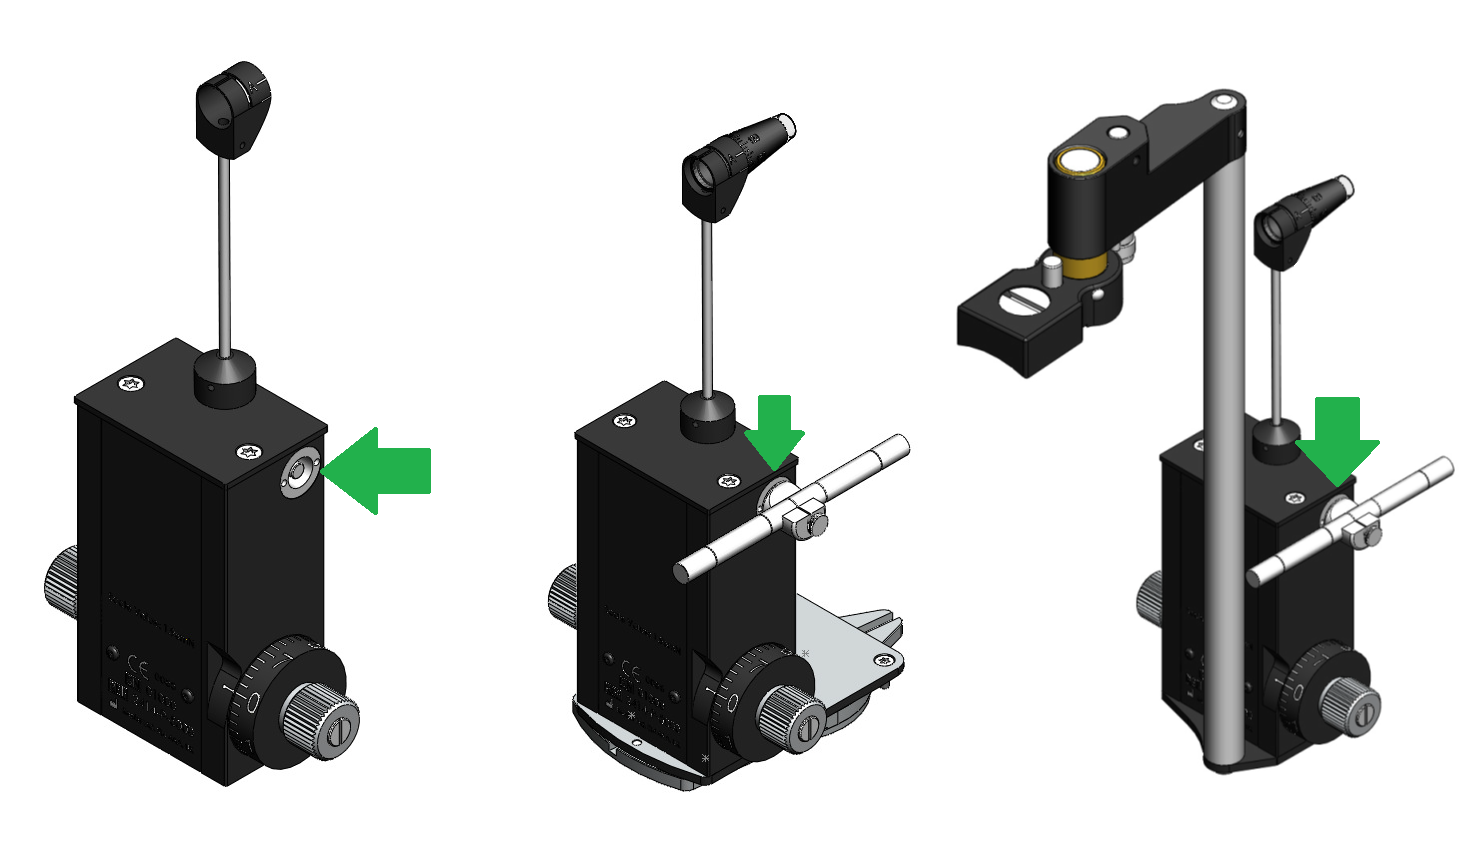
Make sure you have adjusted the calibration bar to 2mmHg and insert the key as shown below (The calibration bar is not correctly adjusted on the image below, this is simply for illustrative purposes of where it should be inserted).
The principle is the same for the T-Type (Take Away Model) and the R-Type (Slit lamp Mounted) tonometers.
Checking The Negative Range
Insert a prism into the prism holder if you have not already done so.

When the feeler arm is in free movement, turn the calibration dial indicated by the green arrow in the image below in the negative range (downwards) as indicate by the black arrow by the ‘width’ of one calibration marking against the index marker (indicated by the yellow arrow) it should swing forward in the direction of the examiner.
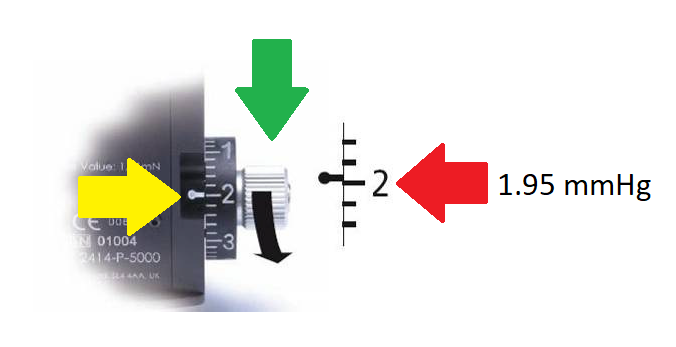
The correct reading at the ‘2’ sequence on the NEGATIVE RANE should be 1.95mmHg
Checking The Positive Range With The Prism In The Prism Holder
Insert a prism into the prism holder if you have not already done so.
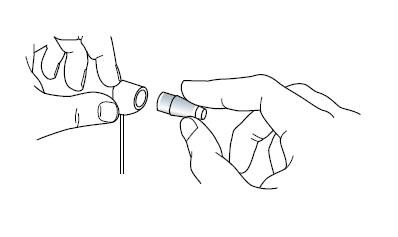
Turn the calibration dial indicated by the orange arrow in the image below in the positive range (upwards) as indicate by the black arrow by the ‘width’ of one calibration marking against the index marker (indicated by the yellow arrow) it should swing forward in the direction of the patient.
The correct reading at the ‘2’ sequence on the POSITIVE RANGE should be 2.05mmHg
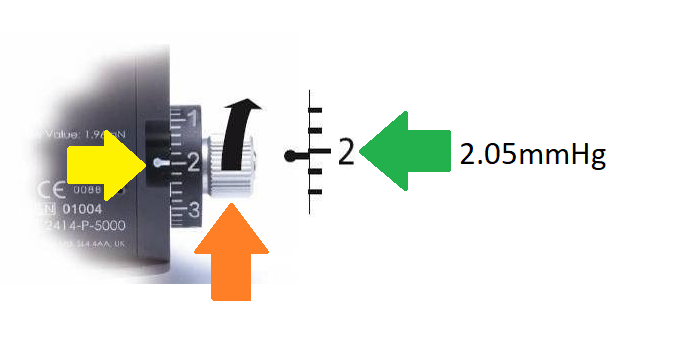
Calibration Error Checking At The ‘6’ Sequence
Checking The Negative Range With The Prism In The Prism Holder
Insert a prism into the prism holder if you have not already done so.

Turn the calibration dial indicated by the green arrow in the image below in the negative range (downwards) as indicated by the black arrow by the ‘width’ of one calibration marking against the index marker (indicated by the yellow arrow) it should swing forward in the direction of the examiner.
However, there is something important to highlight at the number ‘6’ sequence. The OEM's official guidance on this sequence is a slightly greater margin of error at 5.9.
While this is their acceptable standard it is possible to achieve greater accuracy at ‘6’.
Here at Brawn Medical we believe in absolute perfection and that is why all our tonometers are serviced and calibrated at sequence ‘6’ to ±0.5 mmHg, as highlighted by the yellow circle on the image below.
The PREFERRED reading at the ‘6’ sequence on the NEGATIVE RANGE should be -5.95mmHg rather than the manufactured accepted margin of error at -5.9mmHg.
Checking The Positive Range With The Prism In The Prism Holder
Insert a prism into the prism holder.

Turn the calibration dial indicated by the orange arrow in the image below in the positive range (upwards) as indicated by the black arrow by the ‘width’ of one calibration marking against the index marker (indicated by the yellow arrow) it should swing forward in the direction of the patient.
However there is something important to highlight at the number ‘6’ sequence.The OEM's official guidance on this sequence is a slightly greater margin of error at 6.1.
While this is acceptable by their standard it is possible to achieve greater accuracy at ‘6’.
Here at Brawn Medical we believe in absolute perfection and that is why all our tonometer’s are serviced and calibrated at sequence ‘6’ to ±0.5 mmHg, as highlighted by the yellow circle on the image below.
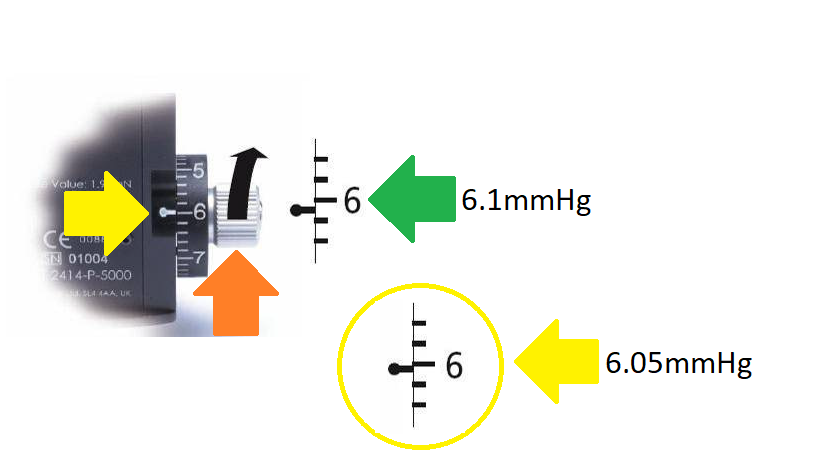
The PREFERRED reading at the ‘6’ sequence on the POSITIVE RANGE should be 6.05mmHg rather than the manufactured accepted margin of error at 6.1mmHg.
How Do I Know If My Contact Tonometer Is In Need Of Service?
Now that you know how to check the calibration of a tonometer, it’s important to understand what to look for.
- Check for signs to see if the unit has been dropped: This could be dents on the corner of the tonometer that were not previously there, bent feeler arm or prism holder.
- Check for signs on base plate of the tonometer to make sure the plate itself is not bent: Hold a ruler or something ridged that is straight against the bottom of the base plate, if you see any visible gaps between the straight edge and the base plated this is a tell sign that tonometer was dropped.
- Check the prism holder: Does the prism slide in and out freely or do you have to force it in and out. Does it look distorted or bent, chances are it may have been dropped.
- I checked the calibration at ‘0’ the forward and backward movement is slow: This is an indication there is too much resistance when turning the dial, this will lead to a rather sticky movement forward or backward depending on which direction you have turned the dial.
- I checked the calibration at ‘2’ with the calibration bar, its outside the acceptable range of ±0.5 mmHg: This is an indication the tonometer is due for a full service.
- I checked the calibration at ‘6’ with the calibration bar, it’s outside the acceptable range of ±0.5 mmHg: This is an indication the tonometer is due for a full service.
- The tonometer was dropped and the feeler arm is bent: Obvious problem being damaged to the feeler arm and inevitably means the calibration is outside of the OEM manufacturers margin of error.
- The tonometer was dropped and the prism holder is damaged: As the example above, the obvious damaged will be the prism holder, with the actual prism not fitting into the holder correctly resulting in the tonometer having a greater than acceptable margin of error when checking for calibration errors.
- The ‘calibration dial’ is very stiff to turn, when compared to a new instrument: This is usually a very bad sign that the instrument has never really been serviced for a very long time.
- The ‘calibration dial’ has sized: This usually happens when the tonometer has been dropped and has suffered a hard fall. In most cases the tonometer dial will not move in either direction forward or backward.
- The ‘calibration dial’ does not sit flush against the body of the tonometer: This likely occurred when the instrument was dropped and the shaft inside the tonometer has been dislodged and as a result has pushed the calibration dial out of position which results in it protruding out more noticeably than it should when you look at the gap between the body of the tonometer and the dial.
How Do I Shortlist A Company To Service/Repair My Contact Tonometer?
In order to decide who to send your instrument to for service/repair you first need to understand what ‘services’ the various vendors provide and what are the differences.
Let’s have a look at the various options vendors are likely to provide you with:
What does It Means To Give A Tonometer A Full Service?
When you ask for a ‘full service’ the service vendor is likely to assume the following:
- Your tonometer is in working order, but needs service as it likely that its reading outside the OEM manufacturer specified margin of error at ±0.5 mmHg
- The full service should be a top to bottom service as stipulated by the original equipment manufacturer (OEM) guidelines and adhere to the some of the follow quality standards:
- This should include:
- Inspecting and testing the tonometer to determine the root cause of the problem
- Inspecting the tonometer for damage and replacing any parts that are required, such as bearings, feeler arm, prim holder etc.
- Finally, calibrating the instrument to the original ‘goldmann standard’ with a margin of error no greater than ±0.5 mmHg (positive & negative range) for all sequences using the correct test equipment and calibrations tools
- Once the tonometer’s is deemed fit for clinical use it should be decontaminated and shipped back to the customer.
- This should include:
What does It Mean To Repair A Tonometer?
When you ask for a repair of a tonometer the service provider is likely to assume the following:
- Your tonometer is in a non-working state (with the intention to restore (something damaged, faulty, or worn) to a good working condition).
- Its currently no longer in clinical use, as it likely broken, damaged or providing inaccurate readings.
What Does It Mean To Get Your Tonometer Calibrated or Re-Calibrated?
When you ask for your tonometer to be calibrated or re-calibrated. This means the following:
- The instrument is no longer within the acceptable margin of error as specified by the OEM manufacturer at ±0.5 mmHg
- You would like a calibration check to be performed and if it fails, then you would like the instrument to be re-calibrated again.
- This does however NOT include the following:
- Giving the tonometer a ‘Full Service’
- Repairing any damaged or faulty items
- If additional work is required other that re-calibration, the vendor will likely charge you extra + the cost of any replacement parts if necessary.
Which One Should I Go For & Why Is That The Recommended Option?
To start with let’s look at the easiest option, the one you SHOULDN’T go for, and that would be:
Getting Your Tonometer Calibrated Only!
Why you might ask?
The answer is rather simple.
By definition, if the tonometer is out of calibration that means it has an underlining problem that has resulted in the instrument no longer being able to provide accurate readings when measuring IOP.
Simply getting it re-calibrated does not solve the underlying problem of why it was out of calibration to begin with.
Example:
Let’s look at a real-life example.
You’ve been involved in an accident and as a result have suffered a substantially deep cut to your body and its nonstop bleeding and requires closing.
Option 1: You can in theory use a ‘band aid’ to close the wound, is this the correct way? Probably not. If anything, it’s temporary measure to stop the bleeding, it’s not a viable long-term solution.
Option 2: Correctly closing the wound would require stitches or surgical staples therefore ensuring the wound will close and heal correctly, preventing any further problems such as infection. This would be the correct long term viable solution for this problem.
Principally getting your tonometer ‘re-calibrated’ won’t solve or help understand why it went out of calibration in the first place, it’s simply a quick cheap ‘band aid’ fix. Typically, it will be out of calibration again in a very short period of time, which will inevitably result in an additional cost once again down the road.
So What’s The Correct Option?
The option you SHOULD ALWAYS go for is a ‘FULL SERVICE’!
Here’s why!
A ‘Full Service’ if performed correctly will require the following steps to ensure your tonometer is suitable for clinical use once again.
- Establish what has gone wrong with the instrument
- Remedy the root cause of the problem
- Perform a full service, this will mean replacing parts such as bearings, feeler arm or prism holder as required.
- Once this has been done, the instrument will require calibration in which this should be done in accordance with the OEM guidelines with a margin of error no greater than ±0.5 mmHg
- Double check the calibration using a test jig
- Decontaminate the instrument
- Finally return the instrument back to the customer
A full service is the only way to guarantee that the tonometer in use within a clinical setting is serviced and calibrated correctly within the OEM manufacturer’s specified margin of error.
Here at Brawn Medical we offer just one option. That’s a ‘Full Service’ inclusive of all parts and labour and for that extra piece of mind a standard three-month warranty on all tonometers.
Best of this all, it’s a fixed price service no matter what has gone wrong with the instrument. If you would like to know more get in touch!
Service Contracts & Preventative Maintenance Contracts, What You Need To Know!
Whether you are a hospital eye clinic / outpatient department or an independent optician, at some point in time a vendor is likely to have in some way shape or form tried to sell you a ‘service contract’ for the service and repair for goldmann tonometers.
But here is what you need to know about service contracts.
They often tend to be very ambiguous without much clarity. So, if you are a hospital or private practice here are some essential pointers to consider when looking at service contracts for tonometer service.
Let’s explore this a bit further:
What is a service contract & preventative maintenance contract?
Typically, this is a business agreement between a contractor and customer covering the maintenance and servicing of equipment over a specified period at a predetermined price agreed by both parties.
Consumer Advice!
What do I need to enquire about before agreeing on any terms of a service contract/preventative maintenance contracts?
Let’s look at a common example below for a service contract for an outpatient department/private practices tonometers:
- In the case of your ‘goldmann tonometer’ service contract, what exactly is covered in the service contract?
- Is this just a ‘Function Test’ carried out by a company engineer on site to determine if the tonometer is in calibration or not? (This is usually done so with a ‘Calibration Bar’)
- If any single tonometer is deemed to be out of calibration or in need of service/repair and needs be sent out for service (to your respective service centre), is this service/repair covered as part of the original service contract price as advertised?
- If the service/repair of the tonometer is not covered as part of the original service contract price can you provide details as to why this is not the case?
- Does this then mean for every tonometer break down I suffer any required work to be carried out at your service centre that could include re-calibration and or full service incurs an additional fee that is not part of the original service contract?
- If this is the case, where is the value proposition for me as the customer and receipt of your service contract if I must pay extra?
- Are parts and labour inclusive in the service/repair or charged as extra?
- What would be the price difference of the offsite service if I didn’t have the service contract when compared to the price you would charge me if I did have a service contract?
Where is the value for money?
Hospitals along with private practices all have a number of resources available to them, but none have infinite resources and value for money is becoming increasingly an important factor when making considerations.
Here at Brawn Medical we have taken notice of this and eliminated the complexities of ambiguous service contracts and provide real value for money that has made our name synonymous for customer satisfaction and value. We offer one of the most competitive deals for goldmann tonometer repairs and service on the market.
If you’re in need of help and advice on what is right for you. Get in touch with us, our dedicated team is fully equipped to cater to your specific needs, no matter whether you are a small family practice or a large hospital group looking to streamline costs and extract maximum value for your budget.
Conclusion
Key lessons to take away from this:
- Accurate IOP measurement can only be obtained if the tonometer in question adheres to the OEM guides that allows for a margin of error no greater than ±0.5 mmHg.
- “Calibration Error Checking” in an outpatient or private practice environment is essential to ensure every tonometer in a clinical setting is functioning correctly.
- Calibration Error Checks should be performed at the following intervals:
- Outpatient Clinicians: Before the start of each new clinic day using a calibration bar at sequences ‘0’ ‘2’ ‘6’. Any instrument not within the desired specification of ±0.5 mmHg should be remove from clinical use, and returned for a ‘Full Service’ and NOT just a ‘re-calibration’.
- Hospital Technicians: Should perform tonometer calibration check twice per week preferably before the start of the new week’s clinic and the end of each clinic week at sequences ‘0’ ‘2’ ‘6’. Any instrument not within the desired specification of ±0.5 mmHg should be remove from clinical use.
- Private Practices: Practice manager and the team should perform daily calibration check before the start of each new business day ensuring the tonometer in each examination room adheres to the OEM manufactures standard of ±0.5 mmHg
References
Kumar N, Hillier RJ. Goldmann tonometer calibration: a national survey. Eye. 2009 Feb 1;23(2):413.
Sandhu SS, Chattopadhyay S, Birch MK, Ray-Chaudhuri N. Frequency of Goldmann applanation tonometer calibration error checks. Journal of glaucoma. 2005 Jun 1;14(3):215-8.
Kumar N, Jivan S. Goldmann applanation tonometer calibration error checks: current practice in the UK. Eye. 2007 Jun 1;21(6):733.
Heijl A, Leske MC, Bengtsson B, Hyman L, Bengtsson B, Hussein M. Reduction of intraocular pressure and glaucoma progression: results from the Early Manifest Glaucoma Trial. Archives of ophthalmology. 2002 Oct 1;120(10):1268-79.
Turner MJ, Graham SL, Avolio AP, Mitchell P. Potential effects of systematic errors in intraocular pressure measurements on screening for ocular hypertension. Eye. 2013 Apr;27(4):502.
Wessels IF, Oh Y. Tonometer utilization, accuracy, and calibration under field conditions. Archives of ophthalmology. 1990 Dec 1;108(12):1709-12.
Disclaimer: All material reproduced in this article relating to the original clinical publication has been done so with the explicit written consent of the original author (Dr Nishant Kumar (MRCOphth, FRCOphth). Brawn Medical accept no credit for the work undertaken by the original author and acknowledges the full credit goes to the original author of the publication. To access the original publication, you may do so here.
References to OEM goldmann standard of calibration error checking has been done so with widely available material published in the OEM's instruction manual. Images used in this publication are referenced from the Keeler KAT instruction manual.
Acknowledgements: Dr Nishant Kumar (MRCOphth & FRCOphth) Consultant Ophthalmologist & Vitreo-Retinal Surgeon & Uveitis Specialist.